
Below is a precise civil work method statement that covers the tile installation procedure for ceramic walls, floors, skirting, up stands etc. at locations shown on the drawings and schedules in accordance with the project requirements specified in the relevant specifications, procedures and drawings, considering safety of workers and quality of the work activities.
Method statement also provides the control sequence of construction and methodology that will be used for preparation, installation, grouting, cleaning and protection of all floors and walls tiling works in overall project site.
Sequence of activities shall be followed as mentioned below for different areas:
For wet area (bath room, Kitchen etc.)
- Plaster works
- High level MEP works and installation water supply pipes
- MEP clearance for wall ceramic tiles
- Wall ceramic works ( Excluding bottom 1st row )
- Grouting wall tiles
- False ceiling works
- Wet area water proofing works
- Floor ceramic works and bottom 1st row ( excluding the tile next to floor traps)
- Grouting floor tiles and the remainder of wall tiles
- Installation of floor traps covers
- Installation of tiles next to floor traps
For Dry areas (Bed rooms, living rooms, corridors, lift lobby etc.)
- Plaster works
- High level MEP works and installation water supply pipes
- MEP clearance for wall ceramic tiles
- Wall ceramic works ( Excluding bottom 1st row
- False ceiling works
- Wet area water proofing works
- Floor ceramic works and bottom 1st row ( excluding the tile next to floor traps)
- Installation of floor traps covers
- Installation of tiles next to floor traps
Roles and Responsibilities for Tile Installation
Project Manager
Ensuring that the project works in his zone are carried out in accordance with company policies and in accordance with the requirements of this method statement and overall project quality plan.
Make sure full compliance of subcontractor works with company quality policies and with the requirements of this method statement.
To ensure that the equipment required to execute the tiling works according to the construction program are available, in good condition, and mobilize any additional equipment that might be required.
Coordinate with the construction Manager, Project Engineer, Safety Engineer, Foreman and Surveyor for a safe and proper execution of the works.
Ensure specific attention to all safety measures in coordination with the site safety officer/engineer.
Construction Manager
Ensure area is ready and safe to start the tile installation works.
Set up required equipment and plant through discussion with the project manager and Project Engineer/Works Supervisor.
Ensure the works are carried out according to the specification and approved shop drawings.
Liaise and co-ordinate with the Project Manager for the agreed sequence of works with respect to the construction program.
Allocation of required labor through coordination with the project manager.
Take precautionary measures with regard to protecting works from hot weather, wind, rain and sun.
Ensure that all works activities shall be carried out in accordance to approved drawings, specifications and quality requirements.
Project Engineer
The engineer will carry out his duties in a manner that will be coordinated by the project manager on a daily basis, and will ensure proper distribution of the workforce and equipment at required locations.
Coordinate with the safety officer to maintain safe working and proper house keeping of the site.
Comply with the safety measures and ensure that all safety teams are aware of the same to prevent accident and loss.
To coordinate with quality inspector for inspection of the areas ready for consultant approvals and to prepare inspection requests with complete attachments.
Ensure that all works activities shall be carried out in accordance to approved drawings, specifications and quality control requirements.
QA/QC Engineer / Inspector
Compilation and implementation of all necessary quality control checklists.
Assisting consultants during the inspections and ensuring that consultant/client inspection requirements are implemented.
Coordinating with the third party lab regarding test and results if applicable.
The control of work performance by means of checking the work before consultants’ inspection and issuing inspection requests & Punch lists as necessary.
Completion of documentation to verify the work performed.
Controlling all inspection activities on-site in line with ITPs.
Surveyor
To establish benchmark from agreed reference points, provide required setting out, level marking, and follow up with regular checks.
Co-ordinate with Project Engineer / Foreman and ensure the approved shop drawings/ constructions drawings will be implemented properly.
Maintain survey details and reports, periodically check the progressing works and advise the Project Manager of any deviation from the drawings.
Foremen/ Works Supervisor
Ensure the works are progressed in the sequence as agreed with the project manager.
Make sure that ready mix concrete ordered from the approved supplier is delivered on time and with sufficient quantity for continuous and smooth works.
Liaise with the Project / Site Manager for the allocation of the work force, ensuring adequate labor is available.
Liaise with the site manager to ensure all the required plant / materials are available to construct the works.
Full time supervision will be required to ensure the works are progressing in accordance with the latest approved for construction drawings and specifications.
List of Equipment’s/Tools
- Hand Trowel
- Mechanical Mortar Mixers
- Levelling Tools & Sprit level
- Tile Cutter
- Grinder with the disc
- Slow speed drill
- Drill Paddle
- Rubber mallet
List of Materials
- Black Sand
- Ceramic tiles
- Tile adhesive
- Tile grout
- PVC tile trim corner bead
- PVC spacer for tiles
Necessary Approvals for Tiling Works
A mock up shall be made for the consultant’s approval.
The mock up shall cover approximately six sq. meter. Once the mock up is approved, it shall be incorporated into the works but all rejected mock ups shall be removed.
Quality of all subsequent tiling works shall match the approved mock up.
All shop drawings and materials must be approved before tiling work activities take place.
Prior to starting any wall or floor tiling work, a clearance to proceed for the area shall be received from the MEP contractor to ensure that all the MEP pipes/ conduits are in place and no further chasing in the area is required each time.
Material Delivery, Storage and Handling
All materials delivered to the site shall be inspected to ensure that the consultant approves the material, manufacturer and supplier.
Any material delivered to site not conforming to the approved material submittals shall be rejected/ returned.
A Material Inspection Request (MIR) shall be raised for consultant’s information and approval.
All materials stored on site shall be protected against the inclusion of foreign matter, water and other damages at all times.
Before beginning with tiling works, waterproofing of wet area shall be done, tested and protected in accordance with the project specifications and approved by the Engineer.
Setting Out Procedure
The tile layout on the floor and wall shall be as per the approved shop drawings, generally the shop drawings will have a layout of tiles as to ensure symmetry about centre lines of the space or areas & to minimize tile cutting.
Cut tiles will be equal on each wall face and not less than ½ full sizes.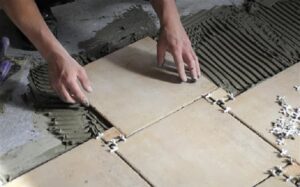
In case if the site condition do not match the shop drawings reasonably, then a fresh drawing should be submitted and approval should be taken before proceeding with the tile installation work.
All joints will be true to line, continuous and without steps. Joints on walls will be truly horizontal, vertical and in alignment. Joints on skirting will match and align with joints on floor tiling.
Joint widths and color of grout will be subject to client selection through mock-up which will be prepared by the tile contractor.
Stairs, skirting & door threshold arrangement & fixing details will be as per architect approval.
Wall ceramic tiling shall be laid from floor level to minimum of 100mm above the false ceiling level.
Tile adhesive preparation for wall tiling
All the ceramic wall tiles and skirting will be installed by using a ceramic tile installation adhesive.
The tile adhesive must be mixed using a slow speed (300-350 rpm) electric drill with a suitable paddle attachment.
Measure 4- 5 liters of clean water and pour into a suitable container. Add the bagged (25 kgs.) powder slowly mixing for 2-3 minutes to obtain a smooth, creamy consistency, remix before application.
Wall Tile Installation (Wet Areas)
The layout, color and pattern of the tiles will be followed as per approved shop drawings and approved material samples.
Installation of ceramic tile will start for the wall from the bottom layer excluding the 1st layer from bottom and from the corner of the wall, and the work proceeds horizontally. The bottom 1st layer of the wall tiles is done after the completion of the floor water proofing and along with the floor tiles.
Al Aluminum strait edge or ply wood strip is fixed on the wall in the correct level as per the flooring to be done afterwards.
The edges of cut tiles will be carefully grinded.
Tile adhesive material will be applied and will be combed by the solid bed trowel.
Rib the surface of the adhesive bed in one direction by using notched trowel.
The tiles will be placed with pressing and twisting/sliding motion to ensure good contact with the adhesive with a uniform thickness of 3-6 mm.
Before adhesive material sets, within 15 minutes after installation, necessary adjustments will be made to give true, regular appearance of tiles and joints.
All awareness will be given to avoid color/shade variations and the tiles will be selected based on batch numbers.
Plastic spacers will be used to maintain the proper joint width and alignment.
Joints will be true to line, continuous and without steps, joints on walls will be truly horizontal, vertical and in alignment.
Joint widths and color of grout will be subjected to client selection through mock-up which will be prepared by the contractor.
Any extra adhesive material from the face of tiles will be removed with a damp cloth before it sets.
No tiles will be fixed in location of fixed fixtures like mixers, bib cocks, angle valves, these tiles will be fixed once fixtures have been positioned in its final position.
Tiles will fit closely and neatly around all plumbing fixtures and around electrical outlets, pipes, fittings etc. so that cover plates or escutcheon will overlap the tiles properly.
Floor Tiling Installation Method
Datum level will be established for the finished floor.
The tiles will be set out as per the wall tiles done earlier for the wet areas and for the dry areas from start point as per the shop drawings referring to setting out points on shop drawing.
For wet areas previously tested and approved water proofing will be protected with a polyethylene sheet if protection screed was not done immediately after the test of the water proofing.
Semi dry screed in the ratio of 1:9 (cement: sand) will be spread, levelled and compacted well to provide the uniform bedding of required thickness and slopes to floor drains.
Bedding mortar in the ratio of 1:3 (cement: sand) at the required consistency will be poured over the semi dry screed.
The tiles will be placed in to the correct position tapped with a rubber mallet to ensure good contact with the slurry and to give the desired finished bed thickness.
Plastic spacers will be used to maintain the proper joint width and alignment.
Joints will be aligned in floor tile at right angles to each other and straight with wall.
Floor and wall joints will be in alignment with each other.
Any extra bedding material from the face of tiles will be removed with a damp cloth before it sets.
No tiles will be fixed in location of fixed fixtures, these tiles will be fixed once fixtures have been positioned in its exact position.
The floors will finish flush with the gratings, strainers and drains.
Skirting
The procedure of fixing the skirting is the same as wall tile installation except that the sequence of fixing skirting is after completion of the floor tiles.
For tile skirtings the joints will match and align with joints in floor tiles if the length of the skirting is same as the floor tile.
Grouting
Prior to grouting, the contractor will submit inspection request to the consultant for the approval of installation of ceramic tiles.
Grouting will commence only after the tile adhesive has set firmly which requires 24 hours after the tile installation.
For wet area before proceeding with the grouting check if the required slope for the flooring has been achieved towards to floor trap and no dead spots remain in the flooring with regards to slope.
The color of the grout will be as per the material approval and the mockup approval.
All plastic spacers will be removed before grouting.
The joints will be 6 mm deep and are free from dust and debris.
Grout of approved color will be used based on approval of mock up.
Mixing of the tile grout material will be carefully done as per manufacturer instructions.
Grout not used within the one half hour time of mixing will be disposed from the site and do not re-temper grout.
Grout will be forced to fill the joints by using a flat edge stainless still scraper and completely to its entire depth.
Excess grout on the surface of the tile will be removed using dry cloth or sponge.
For uniform cured grout joints, the floor will be allowed to cure (air cure) for 72 hours. Floor will be protected from traffic and other contaminants by using polyethylene sheets cover or “NO ACESS” signs.
Cleaning
Any grout spread over the tile will be removed by using a Scotch pad.
Upon completion of the work, all debris, equipment’s and excess materials resulting from the work will be removed.
Protection
The finished area will be closed to human or other traffic completely until mortar has set usually a complete period of 24 hours.
Cleaned tiles will be covered by protection carton paper (2 mm thick) or polyethylene to protect from traffic and stain until building is complete.
Inspection: Tile contractor will submit request for inspection and approval RFIA to the consultant for the final acceptance of the ceramic tiles.
ATTACHMENTS
- Tile Inspection Checklists
- Inspection & Test Plan
- Risk Assessment
- Technical Data sheet (TDS) for Tile adhesive and Tile grout materials.